Smart pipetting for high throughput experiments
Optimizing automated liquid-handling protocols can be tedious, even for simple tasks.
iPipet was born out of necessity as an alternative to costly (often temperamental) robots.
We hope you find it useful!
To learn more:
Check out the blog post, press release and a Nature Outlook article.
If you use iPipet please cite:
iPipet development was supported by NIH grant R21 HG006167
GETTING STARTED:
iPipet Demo on Vimeo.
The first 4 columns must be in the following order:
source plate, source well, destination plate, destination well. (Column 5 is optional and may include volume.)
Note: the header will be skipped so as long as the column order is correct you can name the columns whatever you'd like. Just be sure to include a header in the file.
Wells must be numbered 1-96 (or 1-384). Wells 1-8 correspond to wells A1, B1, C1 ... H1 NOT
A1, A2, A3 ... A8. If your wells are not in this order or are labeled alphanumerically (ie. 'H1' instead of '8') an easy solution is to first sort by the well columns so that they are in the correct order and then assign the correct number.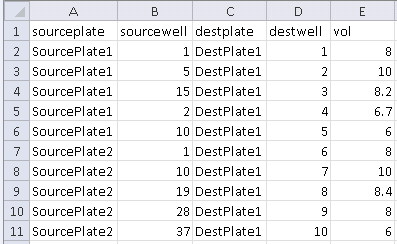

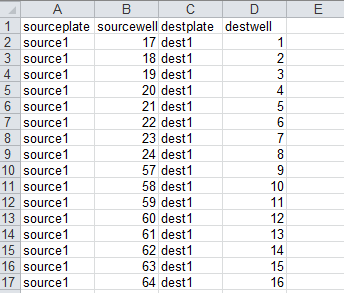
If you select the multi-channel pipet option on the home screen, your CSV file must be formatted accordingly:
Source and destination wells must be in groups of 8 adjacent wells.
For the example CSV on the right, columns 3 and 8 in the source plate and columns 1 and 2 in the destination plate will be illuminated.
See the multichannel demo to get an idea of how the run screen looks.
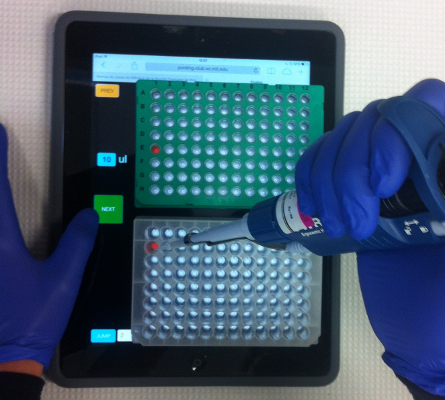
It is highly recommended to test the program before handling actual samples to be sure the design is correct.
A layer of plastic wrap over the tablet screen works well to limit plate movement and still works with gloves. Taping the corners of the plates to the plastic wrap works well if you find that they are moving too much.
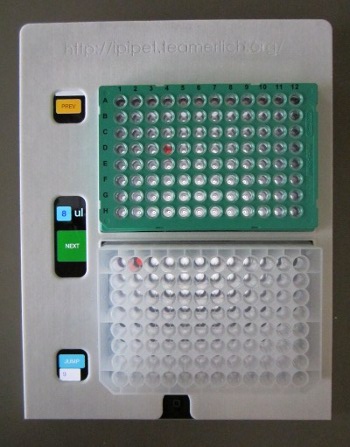
You can also order a custom 3D printed plate adaptor like the one on the right. Simply download the STL file and find a local 3D printer.
6. Make sure you have all your plates and you're ready to go!